Set the Air Pump Pressure
Air pump pressure is directly related to fuel delivery. If the pump pressure is incorrect, the fuel delivery will be incorrect. As a result the heater will not run to specs.
How to Set the Air Pump Pressure
Pump pressures range from 3 PSI to 6 PSI depending upon heater BTU size. A loss of only 1 PSI translates to a 17% to 30% loss of fuel flow. You must know the specified required pressure and set it accordingly.
Heaters with hot surface ignitors are extremely critical to pump pressure. If the pressure is off by 1/2 PSI the heater may run for 5 seconds then shut down because of ignition failure. The only way to correct this problem is to set the pump pressure to the recommended pressure specification.
-
- The first step in diagnosing any heater problem should be checking the output of the air pump. Determine the air pressure required for the heater model that is being tuned. The air pump,in turn, is responsible for fuel delivery.
- If you don’t know the required pressure look for a decal on the side of your heater. This decal will state the model number, serial number, fuel capacity, pump pressure, etc.
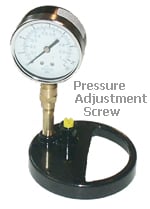
- If you have plastic end cover M29609 it has two threaded holes. Find the hole on the left with the square plug. Remove the plug and screw in the nipple end of the guage into the threaded hole. Check for air leaks with soapy water.
-
- If you have plastic end cover M16545 it has 2 threaded holes. The shorter projection with a hole on the left has a square plug inserted Remove the plug. Screw in the nipple end of the gauge into the threaded hole. Check for leakes with soapy water.
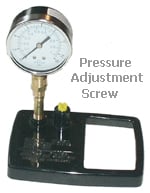
- The other hole, longer projection, has a screw which adjusts a ball and spring relief valve assembly. Carefully adjust the screw until the gauge is reading the pressure level that is specified on the heater’s label. If operating properly, the pump should produce more pressure than is requird to operate the heater. The relief valve allows the excess air to escape before being sent to the nozzle.
- Replace the plug and test for a leak.
- If you are unable to reach the desired pressure, spray soapy water around the seal of the end cover. At the same time check the plastic cover for a crack. A cracked cover will not allow the heater to perform properly and will not allow for an accurate reading. The pump must be set at the specified pressure in order to have adequate fuel atomization. Replace if needed.
- If you set the pressure to the specs and the heater does not perform properly or the cone does not glow a soft red, then check for other fuel delivery problems. A clogged fuel filter, cracked rubber hose, clogged or worn nozzle , or a cracked nozzle adapter can also cause performance issues. Soapy water lightly sprayed in these areas will quickly identify the problem most of the time. Any air leak will create problems.